Lab Policies
These policies were written to ensure the protection of the priceless materials we work with. If you have any questions or need clarification, contact your supervisor. Additional university library policies can be found in the student handbook given out to all new hires, contact your supervisor if you did not receive one.
General
- Please notify your supervisor by email or telephone if you are unable to make your shift.
- Only the lab supervisor or IT staff should install any software on the workstations.
- You may use a personal laptop or tablet when on break.
- Please remember to take short breaks during your shift to maintain mental focus and clarity. It is always a good idea to look away from your computer screen for 30 seconds every half hour to give your eyes some rest.
- We do share the building with other library staff, so please use inside voices.
While at Work
- Always wash your hands before handling materials, always.
- Make sure to clock in, Kronos is your responsibility. You can access Kronos here or the machine outside of the break room. If you miss a clock in or out, just let your supervisor know and they’ll work it out with you.
- Sign into chat and let your supervisor know you’ve arrived at work and when you are taking your break.
- After cleaning the scanner glass, be sure to return the glass cleaner and wipes. Remember to dispose of your wipes so as not to contaminate any materials.
- Feel free to listen to music using headphones, but be mindful of the volume so the lab supervisor doesn’t have to shout or wave for you to hear them.
- Handle all materials appropriately and if you are unsure how to handle something, please ask the lab supervisor for assistance.
- If you have completed a task and are waiting for a new one, let your supervisor know by person or email.
- It is imperative that food and drink is not consumed at a workstation. Contamination of materials is a risk best avoided by eating in the break room. Water is permitted at a workstation, but it must be placed on the floor in a closed container. It is good practice to drink water away from the workstation.
- Areas should always be kept clean and neat.
- Please be mindful of the arrangement of materials as they need to be kept in original order and not in danger of falling off a desk or scanner.
- Personal belongings should always be on the floor or in the bottom file cabinet drawer. No bags, coats, or large amount of books should be on the desk. Any books being used for homework or reading should be on a separate surface from the materials.
- This is a pencil-only environment. The use of pens is prohibited.
Leaving Work
- Please clean up your work area.
- • At the end of a shift the staple removers and anti-static brushes should be placed back in the closet, and dirty cotton gloves need to go in the bag labeled “dirty”. Film holders should be placed in the top filing cabinet drawer of a workstation. Note: Each workstation has its own staple removers and anti-static brushes in the desk drawer. Clean cotton gloves are kept in the bag labeled “clean”. Dirty gloves go in the laundry basket.
- Make sure to update your spreadsheet before leaving.
- After completing your task, please turn off your scanner.
- Make sure to clock out of Kronos and sign out of the workstation.
Scanning
- Lab manager assigns a set of materials, digitization settings, and handling instructions to scan technician.
- Scan tech uses Google Docs spreadsheet or CollectiveAccess (depending on the project) to track per scan progress.
- This includes recording notes that came with the item, or if anything is written on the back of a photograph. Always include where the note is physically. Eg. “On back: note” or “On envelope: note”.
- Date scanned and initials of scan tech
- Images are typically scanned as master tiffs, but this depends on the project and the scanner.
- When finished scanning for the day (regardless of box/folder completion) the tiffs are then uploaded to the “Masters Temp” drive until final quality control confirms an entire project has been completed.
- Lab supervisor will walk through box with scan tech upon completion.
Quality Control
- Once an entire box/oversize folder of materials is digitized and uploaded to the Masters Temp, the lab manager then goes in and checks the digital images for:
- Dust, specks, any foreign artifacts
- The entire image having been scanned, rather than being cut off
- Proper scan dpi/ppi and file format
- Naming inconsistencies
- Number of files in digital folder versus number of recorded images in spreadsheet
- Correctness of spreadsheet metadata (misspellings, misplaced data)
- The lab manager will highlight an images’ row in the spreadsheet if it needs to be re-scanned and assigns that task to the scan tech.
- Any slides rescanned on a flatbed should be noted in the spreadsheet so they can be flipped appropriately during Photoshop.
- Rescans are to be placed in a “Rescans” folder within the Box folder.
- Once an entire project has been scanned and QCed, the lab manager will replace the original Master files with the Rescans and update Trello with the progress.
- All re-scanned images replace the former master tiff file, and the new scan date is updated in the spreadsheet. The re-scanned image must also be Photoshopped along with the rest of the files in its batch.
Photoshop
- A scan tech processes their scanned batch of images in Photoshop. First they must copy them off of the Working storage server and onto their computer. This way any mistakes made can easily be rectified by copying the images back down (rather than messing with the Master images) and the server can get overwhelmed by multiple stations editing on it at the same time.
- This workflow of scanning a box and Photoshopping a box right after has been adopted to reduce the amount of backlog processing work that accumulates when working with multiple projects, and gives the scan tech a chance to quality control their own work before it goes to the lab manager.
- For Retro TDs, all PDFs for a batch are uploaded to Box Sync and processed from the Box Sync folder. This allows instant updating of the files to be passed onto the next step of the project.
- The scan tech ensures all images are Photoshopped and copied back on to the Working storage, then proceeds to their next batch of materials for scanning if they did not spot any items which might need re-scanning.
All materials must be handled with care
Much of the damage that books and archives sustain is due to poor handling. As a partner with cultural heritage institutions and archives across the state, we have a responsibility to ensure the best possible care of the materials in the collections we are working with. All student scan technicians are trained by Special Collections in the handling of materials.
Retrieving materials for digitization
- Follow the instructions of the archivists in Special Collections.
- Hands must be “clean” before handling items in any collection.
- “Clean” means to wash and dry hands thoroughly. Do not use lotion or hand creams after washing.
- Some materials should be handled -only- with cotton gloves. This includes: negatives and photographs. Do not use cotton gloves for handling books, paper, or glass plate negatives.
- Some materials should be handled -only- with nitrile gloves. This includes: glass plate negatives.
- Collection items should be supported at all times (e.g. if a rare book is opened, its covers must be supported from beneath, using a cradle or blocks).
- Collection items should always be removed one at a time
- Use two hands to carry large volumes or boxes.
Safeguard the integrity of archival documents by maintaining their original order
- Use only one folder from a box at a time.
- “Maintain the existing order of material” within each folder and box
- Put all materials away correctly.
Do not
- Wear jewelry or watches while scanning.
- Keep any beverages or food in your work area when handling original materials.
- Make any marks on material or erase existing marks
- Write, lean or rest on top of materials.
- Use fountain pens, felt tipped pens, or similar writing instruments alongside materials
- Touch the text or image on the page. Handle all materials by their edges when possible.
- Fold, tear or cut documents
- Make tracings of any documents
- Rest any other objects on the surface of any items
- Apply paper clips, fasteners, tape, Post-it notes or rubber bands
- Stack books more than three high.
- Place items on the floor.
- Use hand lotions before handling materials.
- Allow books or pamphlets dangle off scanners. Collection items should be supported at all times.
How to clean the platen (Instructions from Epson manual)
- Press the power to turn the scanner off, and unplug the power cord.
- Caution: Always unplug the scanner before cleaning.
- Use a soft, damp cloth and mild detergent to clean the outer case.
- Caution: Be careful not to spill liquid or let water get into the scanner mechanism
or electronic components. This could permanently damage them. - Never use alcohol, thinner, or corrosive solvent to clean the scanner. These
chemicals can damage the scanner components as well as the case.
- Caution: Be careful not to spill liquid or let water get into the scanner mechanism
- Clean dust and smudges from the document cable glass with a soft, dry cloth (a
microfiber glass cleaning cloth is recommended). You can also use compressed air
spray cleaner.- To remove grease, use pretreated lens or scanner wipes, or a small amount of glass
cleaner on a soft cloth. Dry the document table glass afterwards. - Caution: Never spray glass cleaner directly on the document table. Always spray
it on a cloth first and then wipe the glass . - Never use a harsh or abrasive brush or cleaning product to clean the document
table. A damaged glass surface can decrease the scanning quality. - Avoid leaving photos on the scanner glass for extended periods of time, or
residue from the photos may adhere to the glass.
- To remove grease, use pretreated lens or scanner wipes, or a small amount of glass
Naming Folders
Following a logical naming schema for folders is just as important as the file naming schema when scanning.
We recommend sticking to the physical structure of collections in a hierarchy such as:
- Institution name folder
- Manuscript/Series/ or Collection name folder
- Box name folder
- Folder name folder
- [files]
- Document name folder – this is an optional folder. Some documents, such as books, can be associated with hundreds of files. It is usually easier to sift through a collection when high volume documents are separated into their own folders rather than all being in one folder.
- [files for document]
- Folder name folder
- Box name folder
- Manuscript/Series/ or Collection name folder
Regardless of whether one is scanning for five minutes or an hour, it’s important to always have a folder name with the collection title in it for longevity and to avoid user error. For the purposes of quality control and preservation, folder naming is of the utmost importance.
Batch Folder Creation in Windows
If you have a list of folders you wish to create in another folder, then add those names to a blank text document by one line each. Add “mkdir” in front of each folder name without the quotes.
e.g.
mkdir Mss2_Box001
mkdir Mss2_Box002
Save the text file, but add “.bat” to the end of the text file name. Place the .bat file in the directory you wish to create the folders in and then double click the file to run it.
Naming Files
Your supervisor will always assign the file naming scheme or convention for you to follow during digitization.
Multiple files to one image/book and front and back
Some files will need to be scanned in parts or pages. Whether a book or an oversize item that is represented by several images, the first image will always be _001 and the following files incremented as needed.
We will use “_front” and “_back” to eliminate any misunderstanding of a different alphanumeric naming schema.
Special Collections file naming schema
Clemson University Libraries Special Collections mainly organizes content based on two categories: University Archives (ua) and Manuscripts (MSS).
- University Archives Series
- ua#_”Box”#_Folder#_Item#_Page# – e.g. “ua81_Box01_01_002_003”
- Oversize: Series#_OS_Folder#_Item#_Page#
- Manuscript Archives
- Manuscript without series: Mss#_”Box”#_Folder#_Item#_Page# – “Mss71_Box01_01_001_001”
- Manuscript with series: Mss#_Series#_”Box”#_Folder#_Item#_Page# – “Mss71_01_Box01_01_001_001”
- Manuscript Oversize: Mss#_Series#_OS_Folder#_Item#_Page#
National Park Service file naming schema
For the NPS, we use their park code, usually the first two letters of the first two words in the park’s name, eg. Fort Sumter FOSU, and then the given catalog/id number for an item. Sometimes an accession number is also used if catalog numbers repeat over multiple collections. If no catalog number has been assigned, then we use a similar schema as the Special Collections one listed above.
Other file naming conventions
Much like the Special Collections file naming schema, it’s ideal to name a file based on its physical presence within a collection. Most collections will be assigned a short, 3 or 4 letter identifier. If scanning materials from a partner institution, their initials are used. Presbyterian becomes “pre” or Southern Wesleyan becomes “swu”. Refer back to box, folder, multi-page document, and finally page number.
Boxes and folders may not have numbers and shortened names can be used. Even document titles can be used for naming a file, which most institutions prefer. The importance for our team is to scan a file so that when we see just that file name, we are able to identify where it belongs within a collection. Otherwise, it’s important to implement embedded technical metadata within a file’s XMP or IPTC fields. Here one can add information as to who scanned the file, where and when it was scanned, and what collection that file belongs to. Most photo editing software allows the embedding of such metadata.
Always avoid adding symbols to file names. Generally “-“, “_”, and “#” are OK to use, but periods and ampersands (&) should never be used.
Instructions on how to use the various scanning equipment in the lab can be found here.
Click the image below to see our flow chart for determining what settings an image should be scanned at on a flatbed.
- Before you begin to scan, always be sure you have the materials you’ll need for the process: computer, gloves (cotton or nitrile depending on the situation), staple remover, ruler, teflon spatula, pencil and paper, scanning instructions and guidelines.
- Also, your workstation must be free of clutter and all water containers are on the floor. The desk shouldn’t have any food or drink near it.
- Clean the scanner before using it.
- Flatbeds need glass cleaned with a wipe and glass cleaner (no ammonia)
- ADF needs sensor cleaned with a wipe and isopropyl alcohol
- Atiz Bookscanner needs its platen cleaned both on top and under
- Your spreadsheet or instance of CollectiveAccess should be open at all times on the computer. Always keep up with logging which image you are scanning.
- If a photograph has information written on the back, record that information verbatim in the spreadsheet or CollectiveAccess with the phrase “On back:” preceding the information. Refer to Digitization Metadata for a complete guide.
- For example: a photograph has a building name and date written on it. In your metadata, this should look like: “On back: Cooper Library, 1971”, without the quotes
- Transcribe date information to the “Item date” field in the ISO8601 format: YYYY-MM-DD, YYYY-MM, YYYY. If the metadata has “c”, “ca”, or “circa”, record “circa [date]”.
- Do not record information that has been
struck through - Indicate [illegible] if there are bits of text you are unable to read
- Always maintain original order of the materials. Use acid free paper to separate materials if necessary.
- When finished scanning for the day:
- Verify number of images scanned matches the folders on the computer
- Upload images to Masters Temp folder in their respective folders
- Verify the spreadsheet or CollectiveAccess is up to date
- Return materials to storage closet
- Submit end of day form
- Clean workstation area
Metadata in our usage is information about a particular item or set of items. During digitization, we will record information about each item that is scanned. This information is provided to the scan tech either by the digital projects manager, the lab manager, or from transcribing metadata on the item. This form of transcription does not include full-text transcription of manuscript pages or books. It is best to not assume anything about the metadata and merely record what is in front of you. Record all information on back/front of a photograph following the phrase “On back:” or “On front:”.
- Any information (metadata) provided should be transcribed verbatim unless otherwise instructed.
- Series 100 (ua100), University Historical Photographs, will not require transcription of metadata on back or front. This will be provided by Special Collections and Archives.
- Any spelling mistakes identified should be included and including a correction in brackets right after the word is preferred: metdata [metadata].
- If a word is illegible, spell out what you can read and include a question mark in brackets right after, or if you cannot discern any characters, simply type [illegible] with the brackets.
- If a word is crossed out in the metadata, do not include it in the transcription.
- Do not include line breaks or use the return key when recording metadata. Use semicolons to indicate line breaks.
- Do not use any text formatting, such as bold, italicize, underline, strike through, etc.
- Names of creators or contributors should be recorded as [last name], [title] [first name] [middle name], [suffix]. Only reformat names when recording them in the creator/contributor column.
- King, Dr. Martin Luther, Jr.
- Date formatting is based on ISO 8601: [yyyy], [yyyy-mm], [yyyy-mm-dd], circa [yyyy], circa [yyyy-mm].
- If recording a date in a spreadsheet, make sure to precede the date with an apostrophe: ‘1776-07-04. This will prevent Excel from reformatting the date incorrectly.
- Box, folder, and section information (when available) should be recorded for each individual image scanned. When working in a spreadsheet, please include this information in each cell they apply to, not simply one cell and then leaving the rest blank until a new box/folder/section is started.
These are just some simple rules and suggestions to follow when digitizing books.
- Typically these are skipped in digitization: blank pages [especially if there is a large amount] and spines of bound objects.
- Always shoot the covers, even when blank.
- When using the Atiz BookScanner, the laser focus will help with pages the auto focus has trouble with. If for some reason the laser is not working, contact your supervisor for troubleshooting, and shoot in manual mode. To do this, just place a piece of paper with writing on it over the page, take a test shot, and then flip the lens switch to manual focus. This focus will be good for at least 2-3 inches worth of pages. See the Atiz instructions page for more info.
Click here to help determine which side of the slide is the emulsion/dull side
- Brush both sides of slides off in one direction to ensure dust and fibers are removed.
- Slides are filled into trays by each column, or vertically. Often times there will be a discrepancy in the direction the slides were stored (usually by row/horizontally) versus how they must be placed in a tray if a scan tech is scanning from a slide binder.
- Slides are placed emulsion side down in the tray. Usually a slide will have a company’s logo on the emulsion side, otherwise the scan tech will need to check the slide’s reflection in the light to determine the emulsion side.
- Once the tray is full, carefully turn the tray over and examine each slide to make sure none of them are being blocked by the tray.
- Place the tray carefully (to avoid scratching the glass and jostling the slides) on the scan bed with the arrow on the top left of the tray lining up to the corner notch of the film guide (long gray plastic bar). Anything scanned to the left of that notch will result in a distorted image.
- Make sure the scanner’s transparency lid does not have the white backing on it.
- Change your settings to those assigned by the lab supervisor or refer to the FADGI flow chart on the board. Usually slides are scanned as positive film at 2800 or 3200 dpi, depending on the project. Color correction can be turned on and is best combined with the thumbnail option.
- Using the thumbnail option to scan, click Preview.
- The preview will identify each individual slide. There’s no need to make marquee selections.
- Verify each slide is properly identified. If the image has large black bars on the left and right or top and bottom, this means the preview did not identify it correctly. It’s best to skip scanning of that slide for now. Usually there are two pages of images to click through.
- Rotate each slide so that is right reading or rotated properly for correct viewing.
- Click Select All (deselect any misidentified slides) and click the mirror option to flip the slides. This avoids having to flip them in post-production. Make sure the software flipped the second page of slides as well.
- Once naming and file location have been verified, start the scan. There will be a popup box warning of scanning at high resolutions, click OK.
- During the downtime (~20 minutes), it’s best to start filling a second tray with slides and recording any necessary metadata associated with them. This way the trays can be switched out quickly and a new scan can be started. If the second tray has been filled but the first scan is still going, proceed to fill in any necessary metadata for the rest of the slides not in trays.
- NOTE: Due to the nature of our work, one scanner could be scanning slides for hours at a time. This can cause the plastic arm in the transparency lid to scratch on the ceiling of the lid, which leads to tiny white particles on the glass and on the slide. Always check the lid for dust particles and stop scanning when noticing artifacts in a scanned image. These can typically be seen in the preview. Inform the lab supervisor of problem.
Standard Photoshop workflow
- Crop – Press C
- Rotate/Deskew
- Invert – Press Ctrl+i
- Image Size – Press Ctrl+Alt+i
- Color Profile
- Levels – Press Ctrl+L
- Blue Tint
- Red Tint
- Removing Moire
Crop
- Press “C” or select the crop tool.
- Select the image leaving just a tiny amount of room around the borders, unless otherwise instructed.
- You can also rotate the image using the crop tool and then make the crop selection.
- Press Enter.
Below is a video of how to create an AutoCrop and Color profile action. Ask your supervisor before performing an autocrop on your images as there may be different crop requirements for certain projects. This autocrop is not 100% accurate, therefore it is paramount to double check the results. You will have to rename the file results to remove the word “copy”. Renaming using XnView can be found on the instructions page. This action will not deskew images, they must already be rotated appropriately.
- Create action
- Open any TIFF image in Photoshop. Click Create New Action on the Actions Window and give it a relevant name.
- The action should automatically start recording.
- Click File -> Automate -> Crop and Straighten Photos
- Click Edit -> Assign Profile -> Adobe RBG 1998
- Click File -> Save. Save in a different folder from original
- Close the image and close the original image (Photoshop opens the original, then makes a copy of it to crop)
- Click Stop on the Actions Window
- Go back and delete the image you just saved in case you plan on running a batch with that image in it
- Prepare for batch
- Click File -> Automate -> Batch
- If you just created the action, it should automatically be selected. If not, under Play Set, choose your batch action
- Choose the source folder with the original images
- Under Destination, choose Save and Close. Otherwise the batch will keep multiple images open after it finishes or until it runs out of video memory to keep all the tabs open.
- Let it run and then compare the original to the cropped set to make sure nothing was cropped out.
Rotate / Deskew
- Go to Image, Image Rotation, and select which way to orient the image.
- Or, use the crop tool as listed in the Crop section.
- Or, select the entire image using Ctrl/Command+A and then press Ctrl/Command+T. This allows you to rotate the image at any angle freehand. Press Enter when finished.
- If the image is a negative or slide, it was scanned emulsion side down, therefore requiring it to be flipped horizontally on its axis for right-reading. Go to Image, Image Rotation, Flip Canvas Horizontal. Ideal to set custom keyboard shortcut to Ctrl+F.
Invert
- Typically negatives are scanned without the scanner software creating a positive image. This way we have the master file representing the true look of the negative. To make the negative a positive, go to Image, Adjustments, and Invert (shortcut key Ctrl/Command+I).
- Black and white images scanned in color due to damage should be converted to black and white in Photoshop.
Image Size
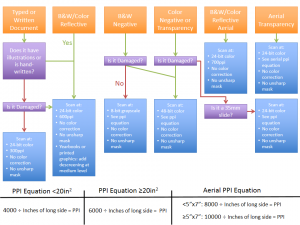
- Negatives, slides, and aerials are scanned to a certain ppi in order to replicate the actual print size.
- Negatives under 20sq inches and 35mm slides should be re-sized to 4000 pixels on the long side. Go to Image, Image Size, and change the largest number to 4000.
- Negatives 20sq inches and over should be re-sized to 6000 pixels on the long side. Go to Image, Image Size, and change the largest number to 6000.
- Aerials under 35sq inches should be re-sized to 8000 pixels on the long side. This does not apply to oversize aerials.
- Aerials 35sq inches and over should be re-sized to 10000 pixels on the long side. This does not apply to oversize aerials.
Color Profile
- All working tiff, color images should have the color profile “Adobe RGB 1998”. Go to Edit, Assign Profile, Select the third radio button and choose Adobe RGB 1998 from the drop down menu.
- JPEGs provided for access should have the color profile “rRGB”.
Levels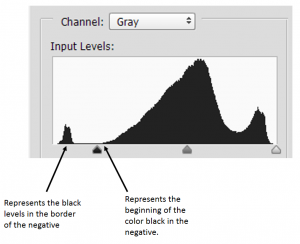

- Level adjustments may be necessary for black and white negatives. When scanning, we turn off color correction for most materials to capture the most accurate master file, which can make older negatives look washed out. This can occasionally apply to slides, as well. If level adjustments are needed, the lab supervisor will include them in task assignments.
- Go to Image, Adjustments, and Levels. There will be a histogram of the black, grey, and white levels of the image. If there isn’t a large black border around the negative after cropping and inverting, pull the black arrow towards the base of the histogram. Do the same for the white arrow. If there is a large black border, you will have one hump to drag the black arrow past.
Blue Tint
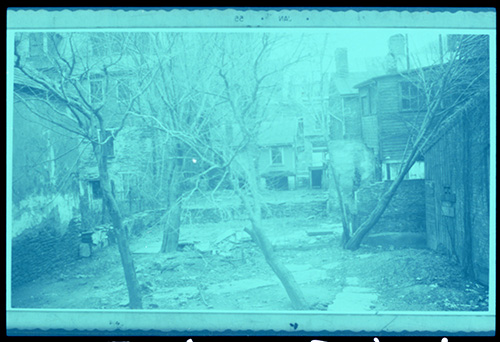
- Solution 1: Go to Image -> Auto Color
- Solution 2: Go to Image -> Adjustments -> Levels. Click on the white eye dropper tool in the new popup box and click on a portion of the image that should be white, then click OK. This works best when scanned with a color patch or black and white negatives.
- Solution 3:
- Add Color Profile first, Adobe RGB 1998
- Go to Image – Adjustments – Match Color
- Click Neutralize
- “If you find that the Color Match takes too much color out of your photograph, drag the Fade slider to the right until some color comes back. To increase the intensity of the color, drag the Color Intensity slider to the right. When you’re happy with how it looks click OK.” (-Jennifer Farley, Remove a color cast…)
Red Tint on Slides

There are several tutorials online to show how to fix this using Levels and Color Balance. For the lab, a Photoshop action has been provided. Contact lab supervisor or project manager if it is not in your list of actions in Photoshop.
Removing Moire – CaptureOne software
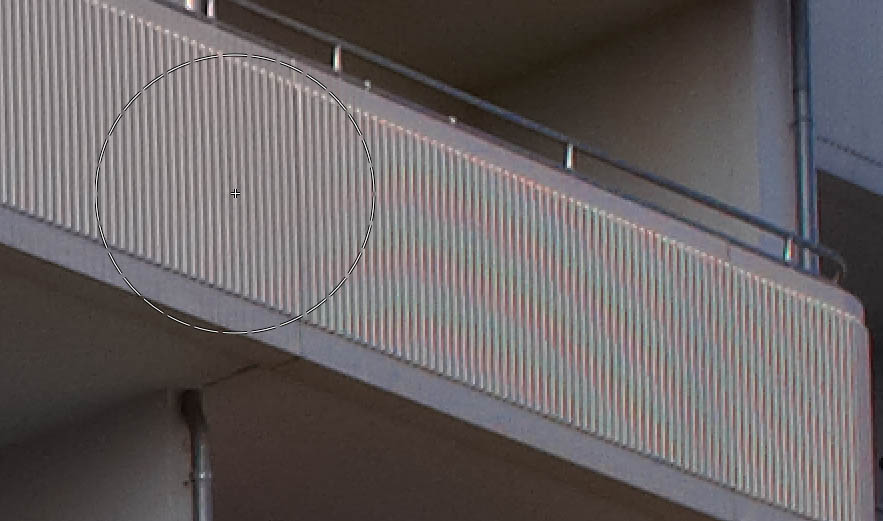
Moire is the rainbow effect on digital images which can occur on sharp images. Instructions below are from the developers of the CaptureOne software.
- Add a new Local Adjustments Layer
- Inverse the mask. This is only an intermediate state. By inverting the mask, we work on the whole image which is necessary when setting up the parameters for the Moiré Tool.
- Set the pattern size to maximum to make sure that the color moiré filter covers a whole period of false colors.
- Now drag the amount slider until the color moiré disappears. You should use as low a value as possible to remove the moiré.
- Reduce the pattern size to the minimum size that still fully removes the moiré. Now we have found the minimum values required to remove the moiré. This is important, as it will minimize the risk of unwanted color bleeding.
- We only want to use the values locally, so invert the mask again.
- Select a suitable bush size and brush away the color moiré.
We recommend working on a computer with a fast processor and solid state drive (ssd), instead of the common hard disk drive, when editing multiple PDFs. PDFs typically require a lot of processing power and a fast scratch-disk. A regular hard drive is often too slow for efficient workflows.
Reducing file size of PDF
Only use this tool for access copies.
- Open Adobe Acrobat Pro/DC
- Select File, Save as Other, and Reduced Size PDF
- Important: In order to actually reduce the file size considerably, under “Make compatible with” select “Acrobat 10.0 and later”. If this option isn’t checked, the file size will not be reduced much compared to the original.
- You can also run this as a batch on multiple files by selecting “Apply to Multiple Files”.
- Once the process is done (best to find something else to do in the meantime) the file should have been reduced by at least 50-60%. Sometimes even more depending on the content of the PDF.
Redacting Signatures from documents (written instructions for Adobe Acrobat Pro, video applies to Adobe Acrobat DC)
- Open Adobe Acrobat.
- Select “Advanced” menu tab, then “Redaction”, then “Show Redaction Toolbar”.
- After toolbar appears, select “Mark for Redaction”. If popup window appears, click “OK”.
- Click and drag a shape along the area that you wish to redact. Double-click on the selected area to bring up a sticky note. Type any notes you wish to add in the box, then close it. Repeat for any additional areas you wish to redact.
- When you are done, click “Apply Redactions” on the Redaction Toolbar.
Adding Pages to a PDF
Combining files into a PDF then OCR and Saving as PDF/A
Acrobat DC will sometimes return this notice “Dimensions of this page are out-of-range. page content might be truncated” and stop batch processing. You can resume after confirming the notice and clicking start again. This usually happens when there is a landscape page.
- Open Adobe Pro and select Combine Files into PDF.
- Drag and drop all of the new JPEGs into the popup dialog box and click Combine.
- Once the PDF has been created, go to Document -> OCR Text Recognition (some versions require going to Tools -> Text Recognition) and select Recognize Text Using OCR. Click OK through the popup windows. Let it run.
- Save the PDF.
- Only do this part if your supervisor asks you to.
- Click Save As and select PDF/A.
- If conversion fails:
- Option 1 – Go to Advanced -> Preflight -> go to PDF/A compliance and then select Convert to PDF/A-2b
- Option 2 – Click Save As -> Select PDF/A -> Click Settings – > Select Save As PDF/A-2b -> Check the box “Create PDF/A-2b according to the following PDF/A-2b conversion profile” -> Click OK -> Save your file
- If conversion fails:
- To run a batch, see video below or:
- Go to Tools, Action Wizard, and on the right hand side you’ll see “Archive Documents”.
- Select Archive Documents and then click Add Files. Select all of your files and then right click “Add Document Description” and click Skip this Step.
- Then change Save As to Save
- Click Start and find something else to do
- Click Save As and select PDF/A.
Setting up action to make accessible PDF
- Go to the Action Wizard in Adobe Acrobat Pro DC and click manage actions
- Select the “Make Accessible” action and click Copy. Give the action a new name if desired and click OK.
- Select the new copy and click Edit.
- On the right side under “Action steps to show:”, click Add Document Description and then select the trashcan icon to delete the action. Using Exiftool to batch add document descriptions will be easier.
- Click Recognize Text using OCR and deselect Prompt User. Click Specific Settings and change downsample to 300 ppi.
- Deselect prompt users for the remaining actions.
- Delete both the Set Alternate Text and Run Accessibility Check actions.
- On the left side under “Choose Tools to add:”, expand Save & Export and select Save. Then click the +-> symbol in between the two sides to add the action after the last action.
- Test the full action on a PDF to make sure it never prompts the user.
- This action can then be exported and imported to other lab computers.
Using Exiftool to batch edit metadata for PDF files
This method uses the command line in Windows to batch embed titles to PDFs.
- In a spreadsheet, create five columns to the following data:
- Column A: call \ExifTool.exePath -title=”
- Column B: Title of document
- Column C (quotation with space after): “
- Column D: \pathtofile (note: your path to file may need to be surrounded in quotes if it has spaces)
- You will only need the document file name and extension if this batch (.bat) file will be located in the same folder as your documents.
- Column E: =concatenate(A2,B2,C2,D2)

Spreadsheet example
- Copy Column E and then paste as values only.
- eg, call C:\exiftool.exe -title=”My Document” mydocument.pdf
- Copy the values only Column E into a text file and then save with the extension .bat.
- Double-click the .bat file to run, or you may need to right-click and Run as Administrator.
- Exiftool will create a new PDF and rename the original pdf with .pdf_original
- This same method can be used to add/change -filename, -keyword, and -author.

Using ExifTool to count number of pages in multiple PDFs recursively
If running this command against files on a server, I found outputting the text file locally instead of letting it output on the server folder you ran the script in will make it go much faster. So instead of just “> pages.txt”, I did “> C:\Users\MyAccount\Documents\pages.txt”. Do not include quotes in command.
- “Path to ExifTool.exe” -T -r -filename -PageCount -s3 -ext pdf . > pages.txt
Using XnConvert to batch resize files
- This conversion process is best implemented if the images are already on a computer, not on a server space.
- Open the XnConvert program
- Select Add Folder to add the one folder with all the working tiff images on the computer. Subfolders will automatically be incorporated. If the program crashes, it is likely due to a memory error. Close out unneeded programs and restart XnConvert.
- Click the Actions tab. If Image Resize is not already a visible option, then click on Add Action -> Image -> Resize. Set the Mode to Longest Side. Set Size to 4000 pixels. Change Enlarge/Reduce option to Reduce Only.
- Click the Output tab. Set output to Source Folder. Make sure Filename reads “{Filename}” and nothing else. Format should be set to As Original.
- Under Options the two boxes which should be checked are Keep Folder Structure and Preserve Metadata.
- Delete Original should be checked.
- Once everything has been confirmed, click Convert and the process will run.
Using XnConvert to batch TIFF files into JPEG
- This conversion process is best implemented if the images are already on a computer, not on a server space, and the JPEGs are being directed to a folder also on the computer.
- Open the XnConvert program
- Select Add Folder to add the one folder with all the working tiff images on the computer which need to be converted to JPEG. Subfolders will automatically be incorporated. If the program crashes, it is likely due to a memory error. Close out unneeded programs and restart XnConvert.
- Click the Actions tab. If Set DPI is not already a visible option, then click on Add Action -> Image -> Set DPI. Set both the X and Y to 300.
- Click the Output tab. The folder should be a JPEG folder created specifically for these images. Make sure Filename reads “{Filename}” and nothing else. Format should be set to JPG- JPEG/JFIF.
- Under Options the two boxes which should be checked are Keep Folder Structure and Preserve Metadata.
- Delete Original should not be checked.
- Once everything has been confirmed, click Convert and the process will run.
Do not attempt without having another copy of files or before asking supervisor for approval.
Using XnView to batch rename files
Using JHOVE (Still image) or FITS (A/V) to validate files.
Using JHOVE 1.22.1
Using later versions of JHOVE (post 1.22.1) may return errors when validating against files created using Capture One software. This method uses the command line in Windows to batch validate still image files. Unless environment variables are setup, this batch file should be run in the JHOVE folder. The output files will be included in the JHOVE folder unless replacing column D with the file path for the output files. Quotes have been added in the template to encapsulate spaces in folder names.
- In a spreadsheet, create five columns to the following data (some fields contain a space at the end):
- Column A: call jhove.bat -c conf/jhove.conf -k “
- Column B: File location and identifier for file, including file extension. Can copy all files, hold shift, and right click then click Copy as Path and paste into spreadsheet or do a directory print if files are in multiple folders.
- Column C (quotation with space after): ” -o
- Column D: Output file name. Typically the same as the input file name with the .txt extension replacing image extension. Copy and paste the input file column B into Column D and with the pasted value selected, perform a find and replace of “.tif” with “.txt”. Remove folder path from text files if you want them output into a different folder for quick checking.
- Column E: =concatenate(A2,B2,C2,D2)

2. Copy Column E and then paste as values only in Column F.
3. Copy the values only Column F into a text file (Notepad) and then save with the extension .bat in the JHOVE folder. You may need to copy a quotation mark in a command and run a find and replace in Notepad with a typed quote in case of formatting issues. Double-click the .bat file to run, or you may need to right-click and Run as Administrator. JHOVE will create output text files. While the process is running, you will not receive any indication which file it’s currently running out.
4. In Windows Explorer, run a search for “Well-Formed and Valid”. If the number of results match the number of image files then there shouldn’t be any corrupted files.
5. Move the JHOVE output text files into their corresponding image master file locations.
Using FITS
Use the same method as the JHOVE example above to help run FITS against files. The command that typically gives validation and checksum results is: fits.bat -i file.tif -xc -o file.txt.
- Column A should have main program and input option: call fits.bat -i “
- Column B should have your file location and extension.
- Column C should have main option and output option (See FITs website for meaning of options): ” -xc -o
- Column D should have your output text file. Include quotes at the end of the Column C value and the text file if you are stipulating a folder path for the file to go instead of the current folder the batch file will run in.
- Column E should have your concatenate formula.
- Column F should have your pasted values of Column E.
- Create your batch file and run it.